A Reverse Enginner's AOSP Custom Shop
Table of Contents
Motivation #
Reversing apps on a stock ROM can be challenging. Not only that we have to fight against unfriendly logics within the app, but also have to deal with various security restrictions (e.g. SELinux, debuggable flag) that the system once used to protect its innocent users.
Fortunately, Android is open-sourced and we are granted to modify whatever parts that we are not happy with. This write-up aims to provide an up-to-date guide on creating a customised Android build dedicated for reverse engineering purposes.
We use the folloing code branches/environments when writing this article, although most techniques should be easily applicable to a wide range of Android versions.
- Android 9 Generic System Image(GSI), branch
pie-gsi, built withaosp_x86_64-userdebug - Goldfish kernel, branch
android-goldfish-4.4-dev, built withx86_x64-ranchu-defconfig - Virtural device Pixel 3 XL (without Play Store) initialised with system image Pie x86_x64 Android 9.0 (without Google APIs)
Features & Progress #
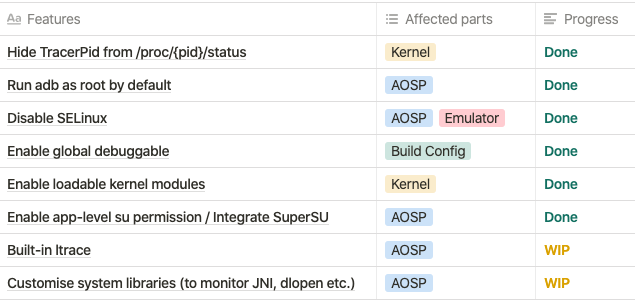
There are a few goals that we want to achieve in this custom build:
- To make debugging easier and less constrained (hide TracerPid, enable global debugging)
- To add/support third party reversing tools/scripts (ltrace, SuperSU, custom kernel modules)
- To enable instrumentation with context (strace is great but we want to know more, such as system calls, JNI invocation, loading of dynamic libraries)
The list below summaries the progress so far. Features labelled with “Done” will be available in our precompiled images.
Downloads #
Precompiled images, AOSP 9.0 + Kernel, x86_x64
Updated at: 2019-11-12
https://drive.google.com/drive/u/1/folders/1NtMzWtppHCfxFA7NKXMWL2J_YdKRc9xC
Build it yourself #
1. Planning: version matters #
Building an Android image can be tricky, and it only becomes trickier if you also want to build the kernel and run them on an emulator. Soon or later, you will be suprsied to find out how fragile the building process is when you run into a series of errors with intricate logs.
The key to avoid (some of) the headaches is to make sure you are working on the correct versions. For building Android, four things matters the most and they obscurely depends on each other: AOSP, kernel, GCC and emulator.
Google has never made it clear on paper about their dependencies on each other. Here we summarise some general guidelines for you to get started:
1. Select an Android version that fits your interest. Bascially, you may choose whatever you want, but pay attention to the major features introduced in big version leaps. In our case, we choose Android 9, the Generic System Image(GSI) branch because for it is the first image that can run on multiple devices, thanks to Project Treble. Also, Android 9 GSI is based on the emulator image, which gives us the maximum flexibility to run a single image on both emulators and real devices.
2. Find a matched kernel version. Long story short, Android kernels derives from upstream Long-term stable(LTS) Linux kernels, which are 4.4, 4.9, 4.14 at the time of writing. As the Android team is aggressively pushing for a more secured system, old kernel support have been regularly dropped in newer Android versions. Exercise caution, and use the table below find the kernel that matches your AOSP. Here we picked goldfish-4.4.
| Android Version | API Level | Linux Version in AOSP | Header Version |
|---|---|---|---|
| 1.5 Cupcake | 3 | (2.6.27) | |
| 1.6 Donut | 4 | (2.6.29) | 2.6.18 |
| 2.0/1 Eclair | 5-7 | (2.6.29) | 2.6.18 |
| 2.2.x Froyo | 8 | (2.6.32) | 2.6.18 |
| 2.3.x Gingerbread | 9, 10 | (2.6.35) | 2.6.18 |
| 3.x.x Honeycomb | 11-13 | (2.6.36) | 2.6.18 |
| 4.0.x Ice Cream San | 14, 15 | (3.0.1) | 2.6.18 |
| 4.1.x Jelly Bean | 16 | (3.0.31) | 2.6.18 |
| 4.2.x Jelly Bean | 17 | (3.4.0) | 2.6.18 |
| 4.3 Jelly Bean | 18 | (3.4.39) | 2.6.18 |
| 4.4 Kit Kat | 19, 20 | (3.10) | 2.6.18 |
| 5.x Lollipop | 21, 22 | (3.16.1) | 3.14.0 |
| 6.0 Marshmallow | 23 | (3.18.10) | 3.18.10 |
| 7.0 Nougat | 24 | 3.18.48 4.4.0 | 4.4.1 |
| 7.1 Nougat | 25 | ? | 4.4.1 |
| 8.0 Oreo | 26 | 3.18.72 4.4.83 4.9.44 | 4.10.0 |
| 8.1 Oreo | 27 | 3.18.70 4.4.88 4.9.56 | 4.10.0 |
| 9.0 Pie | 28 | 4.4.146 4.9.118 4.14.61 | 4.15.0 |
| 10.0 Q | 29 | 4.9.191 4.14.142 4.19.71 | 5.0.3 |
Source: StackOverflow - Which Andorid runs which linux kernel
3. Use the latest GCC(4.9), unless encountered problems. GCC maintains excellent backward compatibility so it is perfectly fine to use the latest release (the google’s special version. links given below). We have seen quirks and imcompatibility warning with gcc4.7/4.8 when compiling the more recent kernels(4.4+) but you may get lucky.
4. Create an emulator with matched API level. Do not use a Google-Play-ready emulator at all time.
This is very important. To enhance app security, all Google apps including Play Store must be run in a safe and trusted environment. Hence, all Play-Store-ready virtual devices have enabled Android Verifed Boot(AVB), which checks for the system image hash and rejects anything other than the stock image.
To see how this is happening, run a Play-Store-ready emulator and check the QEMU output. You shall see dm="1 vroot none ro ... sha1 ..." root=/dev/dm-0 in the QEMU parameters, which instruct the device mapper to setup a ‘verify’ target, verify the image with SHA1 hash and finally mount it at /root/dm-0. Surely, our DIY images will not pass the test.
5. Choose the same architecture for everything. Literally everything, system, kernel, emulator, emulator’s default images etc… This may seem trivial, but easy to miss. Many mysterious bugs arises from incompatible architectures. Here we assume you are a big fan of x86_x64 and let’s stick with it at all time.
2. The Android Build System #
Before getting your hands dirty, you might want to get familiar with Android’s build system first. The build system, comprises of thousands of makefiles, is another monster by itself. Many unique concept/processes are created to glue things together and it can be difficult to grasp on the first look.
The article below provides a good overview on how the build system works, and most importantly how files are organized (you will need that later to decide where to tinker). It is a bit outdated but most of the concept remains relevant.
Embedded Android, Chapter 4 The Build System
3. Building AOSP (9.0+) #
Notice that kernels are not included in the AOSP repo and has to be downloaded separately. We will talk about it again in Building the kernel section.
Since Andorid 9.0, AOSP has switched to a new build system Soong which is much easier to work with. The guides below works on 9.0+. If you are interested in building old versions, please see appendix here.
Follow the guide and setup the environment.
Install build tools https://source.android.com/setup/build/initializing
Install Repo (AOSP’s own version control, basically help to fetch a tons a git repositories)
Download AOSP source code. Specify to use the generic system image branch
pie-gsi$ repo init -u https://android.googlesource.com/platform/manifest -b pie-gsi $ repo sync -cqSet compiler cache
ccacheto speed up future builds. Set maximum cache size to be 50G. The default location is at~/.ccache$ /[aosp_root]/prebuilts/misc/linux-x86/ccache/ccache -M 50G $ export USE_CCACHE=1 # can open a new terminal and monitor cache usage $ watch -n1 -d prebuilts/misc/linux-x86/ccache/ccache -s cache directory /home/yuli/.ccache cache hit (direct) 0 cache hit (preprocessed) 0 cache miss 793 files in cache 2379 cache size 1.3 Gbytes max cache size 50.0 GbytesStart compiling. A fresh new build on a 24-core E5-2620 v3 server takes about 1 hour+ to finish. Subsequent rounds will be significantly faster which takes 10-30 minutes each.
$ source build/envsetup.sh # select target device/architecture/build variant # here we choose aosp(for emulator), x64, userdebug variant # can also enter `lunch` to see a full list of available options $ lunch aosp_x86_64-userdebug # build with 48 threads, normally = 2 x CPU cores $ make -j48- The final images will be available at
aosp_root/out/target/product/generic_x86_64/which contains a dozen of*.imgfiles. Each image correspond to a partition on the device. The usage and definition of such partitions are documented in the appendix.
For running on the emulator, we are only intereted in
system-qemu.imgandvendor-qemu.img- The final images will be available at
::: warning Do not use ‘Eng’ build variant
AOSP has three build variants, namely user, userdebug and eng. While it is tempting to think that eng could give us more flexibility, eng is actually stricter about errors. The system will terminate applications immediately should any assertion failed. For instance, you cannot open “Developer Options’ in 9.0’s eng build because it tried to access an orm_lock service that does not exist in the emulator image. Use userdebug should help us avoid such caveats.
This link explains the difference between build variants in detail: https://source.android.com/setup/develop/new-device#build-variants :::
4. Building the kernel #
Warning1: unless specified in the list(https://source.android.com/setup/build/building-kernels#downloading), many old kernels do not support for building with Repo. The safeist and most hassle-free way is to download the kernel source and build it manually, as demostrated below.
See also: https://source.android.com/setup/build/building-kernels-deprecated
Download kernel source code. Here we use goldfish 4.4.
git clone https://android.googlesource.com/kernel/goldfish/ -b android-goldfish-4.4-devTips: Goldfish and Ranchu
When talking about Android emulator kernels, people have been repeatedly refer to these two terms interchangeably, resulting in lots of confusion. Originally, goldfish represents a virtual board based on QEMU 1 (now deprecated) and ranchu represents a virtual board based on QEMU 2 (i.e. the new emulator comes with Android Studio). Since kernel 4.4, the kernel only supports ranchu/QEMU2. But for legacy reasons, the emulator kernel is still named after ‘goldfish’.
More on Goldfish/Ranchu, see p.11, Android Emulator Kernel.pdf
Download the cross-compiler.
# to build for x86/x64 emulator
$ git clone https://android.googlesource.com/platform/prebuilts/gcc/linux-x86/x86/x86_64-linux-android-4.9
# to build for arm devices
$ git clone https://android.googlesource.com/platform/prebuilts/gcc/linux-x86/arm/arm-linux-androideabi-4.9
Mount both cross-compile tools and kernel source to the build container. Configure the necessary environment variables.
sudo docker run -it --rm -v /home/yuli/goldfish:/src -v /home/yuli/build_tools:/tools android-build-trusty

# for 64-bit kernel
$ export ARCH=x86_64
$ export CROSS_COMPILE=x86_64-linux-android-
$ export PATH=$PATH:/tools/x86_64-linux-android-4.9/bin
# configs can be found under arch/x86/configs
$ cd /src && make x86_64_ranchu_defconfig
$ make -j48 2>&1 | tee build.log

# the compiled kernel is named bzImage
......
Setup is 15536 bytes (padded to 15360 bytes)
System is 5289 kB
CRC 730244cd
Kernel: arch/x86/boot/bzImage is ready (#1)
Tips
If you did not see the last line
Kernel: xxx is ready, that means kernel build has failed with error and no image is generated. Go back and checkbuild.log
5. Running custom images on emulator #
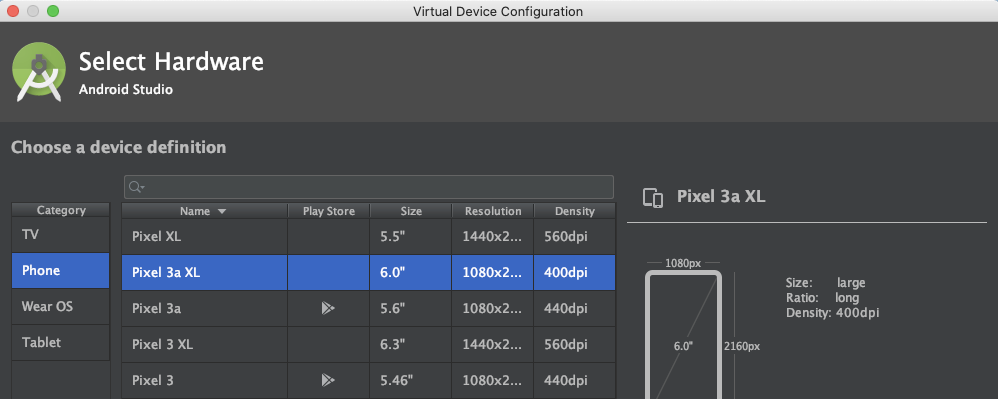
Open Android Studio → AVD Manager, select “Create Virtual Device”. In the pop up window, choose a device with NO play store icons. Here we choose Pixel 3a XL.

Select an x86_64 Image with the same API level of your previous AOSP build. No “Google APIs” as well.

Click “Next”, give the AVD a name and let the emulator to initilise. Close the emulator once you have seen the desktop.
Open
~/.android/avd/, find the directory with the same device name, copy and paste the previously builtsystem-qemu.imgandvendor-qemu.imginto it. The emulator commandline has issues for specifying custom image path, so we have to manually put them here.Setup environments and set the kernel path to the
bzImagefile. Start the emulator and you shall see theinitoutput in the terminal.$ export ANDROID_SDK=$HOME/Library/Android/sdk $ export PATH=$ANDROID_SDK/emulator:$ANDROID_SDK/tools:$PATH $ cd $ANDROID_SDK/tools # start the emulator with custom kernel, @pixel3xl-9 is the avd name $ emulator @pixel3xl-9 -verbose -show-kernel -no-snapshot -kernel ~/bzImage4.4-64-patch-1 -writable-system -qemu -append androidboot.selinux=permissive::: tip Debugging tip Save a copy of the runtime log when the emulator start successfully.
diffit with the failed ones can help to esaily spot unusual behaviours in kernel/init. :::
How to customise #
1. Change kernel/build version string #
- Kernel: goto the top of
kernel_root/makefile, add afterEXTRAVERSI= - System: goto
aosp_root/core/build_id.mk, add afterexport BUILD_ID=
2. Hide TracerPid from /proc/{pid}/status #
Many apps check TracerPid to determine if it is being debugged. To hide it, goto kernel_root/fs/proc/array.c, remove format string after TracerPid.
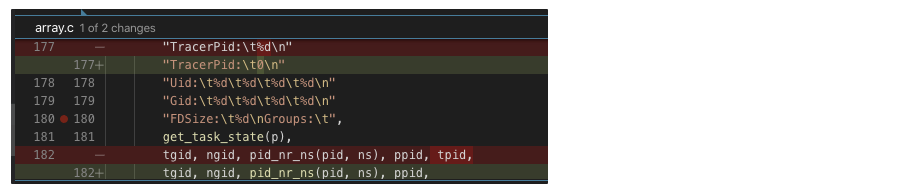
Testing
- Start any app and try strace it:
strace -f -p [pid] cat /proc/[pid]/statusshoud showTracerPid: 0
3. Run adb as root by default #
Modify aosp_pie/system/core/adb/daemon/main.cpp to always preserve root privilege.
# remove other code inside the function and always return false
static bool should_drop_privileges() {
    return false;
}
::: details WHAT DID NOT WORK
(The method below may work on lower Android versions. However on 9.0, ro.secure is always overridden to 1 in the build output. )
adb shell starts as shell user by default. To make it start as root, goto aosp_root/build/core/main.mk , search for ifeq ($(user_variant),userdebug) .
## user/userdebug ##
......
ifneq (,$(user_variant))
    ......
    ifeq ($(user_variant),userdebug)
    # Pick up some extra useful tools
    tags_to_install += debug

    # >>>>>> ADD HERE <<<<<<
    # Run adbd as root by default
    ADDITIONAL_DEFAULT_PROPERTIES += ro.secure=0
    else
......
:::
4. Disable SELinux #
For emulator
Append the kernel command line to QEMU parameters when running the emualtor
-qemu -append androidboot.selinux=permissive
For real devices
Open
aosp_root/device/[vendor_name]/[device_name]/BoardConfig.mkand append the line below.# disable SELINUX BOARD_KERNEL_CMDLINE += androidboot.selinux=permissiveTip: Why couldn’t we use the
BOARD_KERNEL_CMDLINEtechnique on the emulator?After building,
BOARD_KERNEL_CMDLINEgoes to/out/target/generic_x86_64/boot/cmdline, which belongs to the boot image. This will not be picked up by Android emulator because the emulator’s QEMU has its own bootloader implementation (ataosp_root/external/qemu/hw/arm/boot.c).You may have noticed that
aospbuilds never generate anyboot.img, and that’s exactly for the same reason.
5. Enable global debuggable #
Global debuggable flag allows to debug an app without android:debuggable="true set in its AndroidManifest.xml. This spares us the trouble of unpacking/repacking/resigning an apk just for the sake of debugging it, which also elimate the potential package corruption by third-party tools (We have seen apktool used to break some of our apks).
To enable it, simply build AOSP with userdebug flavor. This default flavour automatically sets ro.debuggable=1 in the system property.
6. Enable loadable kernel modules #
Anything is possible with kernel modules e.g. file hiding, system call hooking etc. It provides a fast way to dynamically load new code into a running kernel without the need to recompile everything.
To enable this feature, goto kernel_root/arch/x86/configs/x86_64_ranchu_defconfig, set the following flags:
# Enable loadable kernels
# These options are usually available, directly modify them
CONFIG_MODULES=y
CONFIG_MODULE_UNLOAD=y

# Add other options that are not usually in the defconfig
CONFIG_STRICT_MEMORY_RWX=n
CONFIG_DEVMEM=y
CONFIG_DEVKMEM=y
CONFIG_KALLSYMS=y
CONFIG_KALLSYMS_ALL=y
CONFIG_HAVE_KPROBES=y
CONFIG_HAVE_KRETPROBES=y
CONFIG_HAVE_FUNCTION_TRACER=y
CONFIG_HAVE_FUNCTION_GRAPH_TRACER=y
CONFIG_TRACING=y
CONFIG_FTRACE=y
CONFIG KDB=y
More information about writing/loading kernel modules can be found here.
7. Enable app-level su permission / Integrate SuperSU #
Add SuperSU as part of the system image
1.1. Create a new folder
SuperSUunderaosp_root/packages/apps, copy SuperSU’s APK file inside.1.2. In
SuperSUfolder, create an[Android.mk](http://android.mk)file with the following contentLOCAL_PATH := $(call my-dir) include $(CLEAR_VARS) LOCAL_MODULE_TAGS := optional LOCAL_MODULE := SuperSU # folder name LOCAL_CERTIFICATE := platform LOCAL_PRIVILEGED_MODULE := true LOCAL_SRC_FILES := SuperSU_v2.79.apk # apk name LOCAL_MODULE_CLASS := APPS LOCAL_MODULE_SUFFIX := $(COMMON_ANDROID_PACKAGE_SUFFIX) include $(BUILD_PREBUILT)1.3. Goto
aosp_root/build/target/product/aosp_x86_64.mk, append the name ofLOCAL_MODULEtoPRODUCT_PACKAGESsuch as:... # at the end of aosp_x86_64.mk PRODUCT_PACKAGES += \ SuperSUSet file permission on
suIn
aosp_root/system/core/libcutils/fs_config.cpp, change permission to04755{ 04755, AID_ROOT, AID_SHELL, 0, "system/xbin/su" },IN
aosp_root/system/extras/su/su.cpp, comment out the line that checksuidint main(int argc, char** argv) { // uid_t current_uid = getuid(); // if (current_uid != AID_ROOT && current_uid != AID_SHELL) error(1, 0, "not allowed");
8. Built-in ltrace #
WIP.
Andorid has dropped ltrace support since 8.0 due to incompatible toolchains. But someone has tried to make it build again this year (on master). Maybe we can give it a shot.
Reference: refs/heads/master - platform/external/ltrace - Git at Google
9. (For Instrumentation) Customising System Libraries #
WIP. Maybe hooking with frida/kernel module is a better choice?
List of targets
[libart.so](http://libart.so)/[libdvm.so](http://libdvm.so)JNI Calls- ArtMethod::Invoke()
- ArtMethod structure →
HeapReference<Class>declaring class → DexCache → Dex File - (for bytecode interpreted Java methods) DoCall()
[libbinder.so](http://libbinder.so)- IPClibjavacore.so-execcallslibandroid_runtime.so- Native callbacks
Appendix #
1. Building legacy AOSP (≤8.1) #
Download Repo and setup accordingly (https://source.android.com/setup/build/downloading). Given our device is Pixel, we’re going to use
android-8.1.0_r38> mkdir aosp && cd aosp > repo init -u [https://android.googlesource.com/platform/manifest](https://android.googlesource.com/platform/manifest) -b android-8.1.0_r38 > repo syncUnlike Android 9.0 and above which included all build depencencies in the repository(e.g. OpenJDK is built-in), older Android versions are known to be difficult to built due to compatibility issues. Hence, AOSP has included a hidden dockerfile to setup the necessary build environment. The file can be found in this repository:
https://android.googlesource.com/platform/build/+/refs/heads/master/tools/docker/
First, build the image:
# Copy your host gitconfig, or create a stripped down version
$ cp ~/.gitconfig gitconfig
$ docker build --build-arg userid=$(id -u) --build-arg groupid=$(id -g) --build-arg username=$(id -un) -t android-build-trusty .
Then you can start up new instances with:
# Remember to replace the mount volume ($ANDROID_BUILD_TOP)
# with the AOSP source code path on your machine

$ docker run -it --rm -v $ANDROID_BUILD_TOP:/src android-build-trusty
> cd /src; source build/envsetup.sh
> lunch aosp_x86_64-userdebug
> m -j48
2. Build artifacts #
This section is tailored to Android 9.0+. For changes in 8.0 and below, see: Image partition differences for non-A/B devices before and after Android 9 (https://source.android.com/devices/bootloader/system-as-root#sar-partitioning)
ramdisk.img: mounted by kernel as read-only at boot time, containsinitand a few configs.system.img: the android system. Mounted at/since Android 9.0.system-qemu.img: qemu version ofsystem.img, to be used with emulatorvendor.img: propriatary binaries (drivers, HALs etc.) target at specific devicevendor-qemu.img: qemu version ofvendor.img, to be used with emulatoruserdata.img: contains all application and user data.- On emulator, by default, it creates
~/.android/avd/{adv-name}/userdata-qemu.imgas the persistent/datapartition image. Using-wipe-datawill copy the content ofuserdata.imgintouserdata-qemu.img
- On emulator, by default, it creates
vbmeta.img: contains partition hash tree and public keys for Android Verified Boot(AVB)
3. Find out which makefiles are used #
AOSP is a moving target. It is not uncommon to find out that files mentioned in online writeup go missing OR modifications never achieve its intended effect.
When compiling an image, the Android build systems combines all relevant makefiles into a single giant makefile. Knowing what makefile has been used can be incredibly helpful to determine where you should find the relevant target.
Add the following one-liner to aosp_root/build/core/main.mk after subdir_makefiles section. It helps to print out all makefiles used at the beginning of a build.
# Include all of the makefiles in the system
subdir_makefiles := $(SOONG_ANDROID_MK) $(file <$(OUT_DIR)/.module_paths/Android.mk.list)
subdir_makefiles_total := $(words $(subdir_makefiles))
.KATI_READONLY := subdir_makefiles_total

# ADD THIS LINE
$(foreach subdir_makefile, $(subdir_makefiles), $(info Including $(subdir_makefile)))
References #
Android Build System - eLinux.org
Which Android runs which Linux kernel? - Android Enthusiasts Stack Exchange
Notes on compiling the Android Kernel for AVD | Ayrx’s Blog
android - How do I add APKs in an AOSP build? - Stack Overflow
Compiling an Android Emulator Kernel for Loadable Kernel Modules | strazzere.com
How does ltrace work? - Packagecloud Blog
How to flash a Generic System Image (GSI) on Project Treble supported devices